Wednesday, November 7, 2012

Classic Baked Penne Rigate Casserole


Classic Baked Penne Rigate Casserole

Ingredients:
  • 2/3 (12 oz) package penne rigate pasta, uncooked (I used 100% whole wheat made with whole grains penne rigate from Kroger-where I found this recipe!)
  • 1/2 lb or 1 package of lean ground beef, cooked and drained (I used 1 package of lean ground turkey meat)
  • 1 (26 oz) jar pasta sauce, any kind you want
  • 2 cups (8 oz) shredded mozzarella cheese (or other cheese if you want)
  • Chopped parsley (didn't have this when I made it so I didn't use it)

Directions:
  1. Prepare penne rigate according to package directions; drain. Cook ground beef or ground turkey if you haven't already. Preheat oven to 350 degrees F. 
  2. In large bowl, combine cooked penne rigate, meat, sauce, and 1 cup of cheese; mix well. Transfer to greased 2  1/2 qt shallow baking dish; cover.
  3. Bake for 35 minutes or until hot and bubbly. Uncover; top with remaining 1 cup cheese and parsley. Bake 8 minutes longer or until cheese melts. Refrigerate any leftovers. Makes 4-6 servings.

Friday, July 6, 2012

Red Beans and Rice


One of my favorite easy meals to make and the hubby loves it too!

Red Beans and Rice 
Ingredients: 
  • 1 cup white rice
  • 2 cups hot water
  • 1 teaspoon salt
  • 2-3 tablespoons extra virgin olive oil
  • 1 pkg (14 oz) smoked sausage
  • 1 can red beans
  • Zatarains Creole Seasoning (I use Tony's)
  • Note: I also add garlic powder and/or minced garlic, feel free to add whatever you want!
Directions: 
  1. Add the rice, water, and salt to a sauce pan/pot with a lid.  Bring to a boil, reduce heat to low, then cover & simmer for 15 mins. (I just make white rice in a rice maker separately)
  2. Meanwhile, thinly slice the sausage and drain the juice from the red beans into the sink. 
  3. Add 2-3 tbsp olive oil to a large skillet and begin heating over medium heat. Add the sausage, give a sprinkling of creole seasoning and stir occasionally for about 7 mins until the sausage starts to get sizzly on both sides.  Note: I also added garlic powder and/or some minced garlic.
  4. Add the red beans and stir until warmed through. About this time, your rice should be done or almost done too. Serve the beans and sausage over the rice. Add extra creole seasoning as desired at the table. Serves 2-3.

Easy Brazilian Cheesy Bread Recipe


If you've ever been to a Fogo de Chao or a similar churrascaria/brazillian steak house then you've probably had these and though omg they are soooo delicious! 

Easy Brazilian Cheesy Bread Recipe
  • Prep time: 5 minutes
  • Cook time: 15 minutes
The recipe as presented is fairly basic. Feel free to dress it up a bit with herbs or spices of your choice. (I don't do that, bc I like it the way it is!)
INGREDIENTS
  • 1 egg*
  • 1/3 cup olive oil
  • 2/3 cup milk
  • Scant 1 1/2 cups (170 grams) tapioca flour
  • 1/2 cup (packed, about 66 grams) grated cheese, your preference, though we got the best results from Mexican farmer's cheese - queso fresco (I usually use parmesean and grate it myself and use some other cheese with it too, like either mozzerella or the mexican shredded mix if you can't find the queso fresco cheese)
  • 1 teaspoon of salt (or more to taste)

Special equipment recommended:
  • One or two mini muffin tins. Mini muffin tins are about half the size of a regular muffin pan. The muffin openings are about 1-inch deep, and 1 3/4 inch wide at the top. (I used a regular muffin pan because it's all I had the first time I made it)

*It helps when baking with eggs to start with eggs at room temperature. If you don't plan ahead (that would be me, usually) you can put the egg in a bowl of warm water for a few minutes to gently take off the chill of the fridge.
METHOD

1. Preheat oven to 400°F. Grease a mini-muffin tin. Put all of the ingredients into a blender and pulse until smooth. You may need to use a spatula to scrape down the sides of the blender so that everything gets blended well. At this point you can store the batter in the refrigerator for up to a week.

2. Bake in the oven for 15-20 minutes, until all puffy and just lightly browned. Remove from oven and let cool on a rack for a few minutes. (You don't want to over cook them, so they will be soft, if anything take it out just a tad bit earlier!)
Eat while warm or save to reheat later. - Best served fresh! 
Enough batter for 16 mini muffin sized cheese breads.
*Note that Brazilian cheese bread is very chewy, a lot like Japanese mochi.

Wednesday, May 30, 2012

DIY: In-Ceiling Speaker Installation

When we built our home, we had it pre-wired for surround sound in the family room. The builders put junction boxes on the studs where the speakers would go. We had trouble finding any details on how we could install the speakers on our own with these junction boxes being on the stud without having to cut into the ceiling joist/stud. We definitely did not want to leave the plate cover on the ceiling and put the speakers somewhere else on the ceiling!

So we decided since we were able to do it ourselves then we would make this video to help anyone looking to do this on their own. It saved us plenty of money and is not hard to do.

If you are a little hesitant to cut into your ceiling or wall then stop by your local hardware store such as Home Depot or Lowe's and then get a 4x4 or small scrap piece of sheetrock and practice cutting the hole on it first.

We got our speakers from Monoprice.com. Check out the video below that we made for how to install in-ceiling speakers on your own! A great DIY project! 


For some reason the video won't show, so here is the direct link to it: 


Friday, May 18, 2012

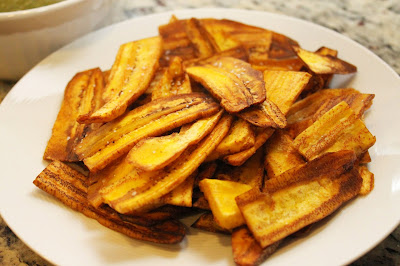
Plantain Chips & Chimichurri Sauce/Dip


Plantain Chips and Chimichurri Sauce Recipe - jarcarfam.blogspot.com

Plantain Chips and Chimichurri Sauce Recipe - jarcarfam.blogspot.com
These pics were taken from the first time I made this, but I've gotten better at it! :) It's yummy!!

Chimichurri Sauce/Dip
Ingredients:
  • 1 bunch fresh parsley, finely chopped (or use less see below)
  • 1/4 cup cilantro (I usually use more cilantro (1 cup/1 bunch) and less parsley (1/4 cup))
  • 2 bay leaves (I usually don't have this so I omit it)
  • 6 cloves garlic, minced
  • 1  1/2 teaspoons smoked paprika
  • 1 tablespoon fresh oregano leaves, finely chopped (I usually used dried oregano from my spice rack)
  • 1/2 cup red wine vinegar
  • 1  1/2 cups extra-virgin olive oil
  • 1 teaspoon salt
  • 1/2 teaspoon freshly ground black pepper
Directions:
  1. Place all ingredients in a food processor, pulse/blend until combined. Put the sauce in a container, using as needed. Chimichurri will last for up to 1 month, refrigerated. Great for plantain chips and on beef or chicken! Especially skirt/flank steak!

Plantain Chips
Ingredients:
  • 3 large green plantains (I usually like to make more so I use at least 6 plantains or more)
  • Vegetable oil, for deep-frying
  • Kosher salt, for seasoning
Directions:
  1. With a sharp knife or a butcher knife, take off the peel/outer layer of the plantain and I usually like to slice the plantains in half so that the chips are shorter.
  2. Using a mandoline, or sharp knife, finely slice plantains into thin chips (for fancier presentation slice them lengthwise into ribbons).
  3. In a heavy based pot or wok, heat vegetable oil over medium heat (to 375 degrees F). You can test to see if it's ready by a drop of water or a small piece of plantain.
  4.  Fry the plantains in small batches until crisp and golden, about 5 to 7 minutes. Make sure you don't burn or over cook them. Using a slotted spoon, transfer to a plate lined with a paper towel or two. Season with a little kosher salt immediately after each batch. Enjoy!

I want a better mandoline slicer, but right now I just use a cheap slicer I got from Walmart and it works okay. Here is the one we have: http://www.walmart.com/catalog/product.do?product_id=16565405&findingMethod=rr

Sunday, May 13, 2012

Slow Cooker Dump and Go Cheesy Chicken


Slow Cooker Dump and Go Cheesy Chicken
Prep Time: 5 Minutes
Cook Time: 6 Hours
Ready In: 6 Hours 5 Minutes
Servings: 5

Ingredients:
  • 6 skinless, boneless chicken breast halves
  • 2 (11 ounce) cans condensed cream of
  • Cheddar cheese soup
  • 1/2 cup milk
  • salt and pepper to taste
  • 1 teaspoon garlic powder
DIRECTIONS:
1. Spray slow cooker with cooking spray. Place chicken breasts inside.
2. In a medium bowl mix together soup and milk, and pour mixture over chicken. Season with salt and pepper to taste and garlic powder.
3. Cook on High for about 6 hours. Note: Do not lift lid while cooking!

See ratings, tips, pics and adjust the recipe for your amount of servings at: http://allrecipes.com/Recipe/Slow-Cooker-Dump-and-Go-Cheesy-Chicken/Detail.aspx

Friday, May 4, 2012

Stuffed Green Peppers


   Pics from when I made it!
Stuffed Green Peppers:
Original Recipe Yield: 6 servings
Ingredients:
  • 2 cups water
  • 1 cup uncooked white rice
  • 3 large green bell peppers, halved and seeded
  • 1 1/2 pounds lean ground beef (or you could use ground turkey)
  • 1 onion, diced
  • garlic powder to taste
  • salt to taste
  • ground black pepper to taste
  • 1 (15 ounce) can tomato sauce
  • 2 cups finely shredded mozzarella cheese
Directions:
  1. In a medium saucepan, bring water to a boil. Add rice and stir. Reduce heat, cover and simmer for 20 minutes.
  2. Preheat oven to 350 degrees F (175 degrees C).
  3. Place green bell peppers in a medium saucepan with enough water to cover. Bring to a boil and cook for 10 minutes. Remove peppers from the water and set aside in a 9x13 inch baking dish.
  4. In a large saucepan over medium heat, brown the ground beef; drain. Return to heat and mix in onion, cooked rice, garlic powder, salt and pepper. Pour in tomato sauce and mix thoroughly. Let simmer for about 10 minutes. Remove from heat.
  5. Spoon the meat mixture onto each half of the green peppers. Bake in the preheated oven for 45 minutes or until mixture begins to turn golden brown.
  6. Sprinkle mozzarella cheese over the top of each stuffed pepper. Return to the oven and bake until cheese is lightly browned, about 5 to 10 minutes.

Adapted from:

Thursday, May 3, 2012

Easy Taco Night with Veggies!!


Easy Taco Night with Veggies! - One of our favorites! I literally eat 5 of these tacos all by myself (that's my plate pictured!) with no sides because I just love the tacos that much!! :) I crave these tacos sometimes, they are that good to me! haha
jarcarfam.blogspot.com - Recipes - Easy Taco Night with Veggies!!

Ingredients:
  • Taco Kit (we like Taco Bell's hard shell taco kit)
  • Ground turkey or beef
  • 1 or 2 onions (your preference)
  • 1 or 2 bell peppers (your preference)
  • Olive Oil or Extra Virgin Olive Oil
  • shredded cheese (we use the shredded nacho/mexican cheese)
  • and any other toppings you may want (pico de gallo, guacamole, sour cream, etc.) 


Directions
  1. Slice bell peppers and onions, put enough olive oil to cover the bottom or a lil less and turn on medium-high heat and add veggies. Stir/mix up with tongs while cooking. Cook until it is how you like it, I like to cook ours until they are very soft and a little browned.
  2. While the veggies are cooking, brown the ground turkey/beef and follow the rest of the directions on taco kit box...and you can go ahead and have the oven pre-heating also for the hard taco shells.
  3. Prepare and enjoy your tacos once everything is done! :) Great with a side of beans or Mexican rice!  

Breakfast Casserole


One of my favorite breakfast recipes! I found it from kevinandamanda.com, but apparently it is just like how my grandma makes it too for Christmas in New York when she lived there! :) Feel free to add veggies or whatever else you want to it also to make it your own! Yum!


Breakfast Casserole
Ingredients:
  • 1 pkg crescent rolls
  • 1 lb mild sausage, browned and drained
  • 6 eggs, beaten
  • 2 cups shredded cheddar cheese
Directions:
  1. Preheat your oven to 350. Take a 9×13 pan and spray it with Pam. 
  2. Roll out crescent rolls in the bottom of the pan.
  3. Brown sausage and drain.
  4. Top with an even layer of browned and drained sausage.
  5. Then pour in beaten eggs.
  6. And top with cheese! :)
  7. Bake at 350 for 30 mins.
"If you want to have this for breakfast, you can brown your sausage the night before and keep it in the refrigerator until morning. Then all you have to do in the morning is put everything together and you have a quick and easy breakfast! :) Breakfast Casserole also microwaves up well if you have leftovers."

Monday, April 30, 2012

Evan's Baseball / Texas Rangers Nursery!!

Even before we knew whether or not we were expecting a little boy or girl, we were trying to narrow down ideas for what we'd like their room to look like! We had a couple of ideas that we got from Pinterest, this one was our favorite for a boy, but we didn't feel like trying to paint those squares, so back to the drawing board it was!:
Then one morning I woke up and was thinking about baby stuff, and came up with the perfect idea for a boy's room if we were to have one! I knew it was perfect because I knew Jarred would love it!! Jarred loves the Texas Rangers and the Dallas Cowboys...the garage is already done in Dallas Cowboys, so I figured we could do a boy room baseball themed with the Texas Rangers colors and some Rangers decor! Perfect, right?! I was super excited as I came up with this idea around 6am one morning in February! Then when we found out it was a boy, well it was time to get things going!

Evan's room before:
Evan's Nursery Before - www.jarcarfam.blogspot.com


Looking for a good Texas Rangers Red and Blue that we liked:
Evan's Room - Choosing Texas Rangers Paint Colors www.jarcarfam.blogspot.com
We chose the same red we used previously in our dining room, Red Bay by Sherwin Williams, but we get it in the Behr paint.  For the Texas Rangers blue we chose Southern Blue by Behr.

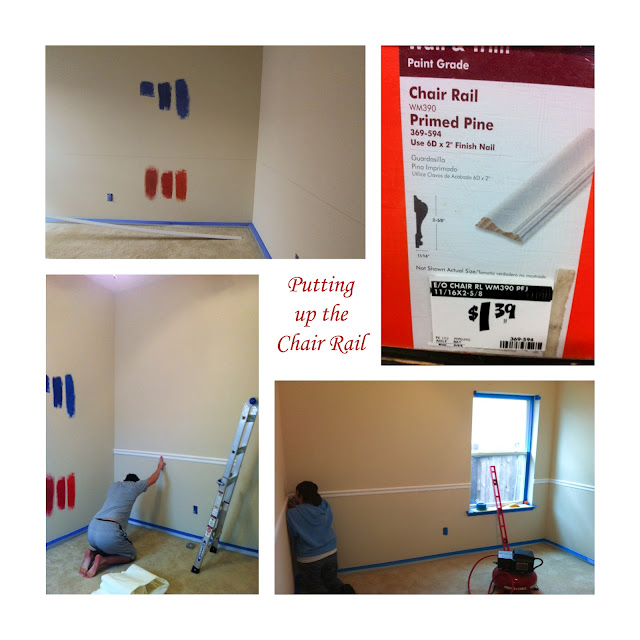
Next, we wanted to put up a chair rail to divide the colors:
Evan's Room - Putting up a Chair Rail - www.jarcarfam.blogspot.com
Then came the painting: 
www.jarcarfam.blogspot.com - Evan's room Texas Rangers Paint colors

Then came the furniture and a lot of decorating! :) 

Now, it is pretty much completely finished!! I am thinking about possibly sewing a cover for the glider so that the cushions go with the room better, but we'll see if I ever get around to that. We have to send out a huge thank you to Linda and Kenny for the glider!! 

I also want to paint one or two baseball paintings for his room if I get some time.  

Check out what it looks like now:
www.jarcarfam.blogspot.com - Evan's Baseball / Texas Rangers Room / Nursery Finished
The dresser and lifetime crib is from Babies 'R Us, the "Expedit Shelving Unit"  and the red "Lekman" storage bins are from Ikea! Oh and the red "Ritva" curtains are from Ikea also, but I had to hem them about 11 or 13 inches...and I used an iron on hemming strip for that.

www.jarcarfam.blogspot.com - Texas Rangers Bedding

I found Evan's name decal on Etsy from Lucy Lews Shop
www.jarcarfam.blogspot.com - Evan's Baseball / Texas Rangers Nursery Room
Crib Mobile from USA Baby store!! 
Thanks to David for helping locate it! It was so hard to find it!

I found the red minky dot changing pad cover from Jenn Creations Etsy shop
We got one in red and one in white!  
I got the idea for a frame collage from this pin on Pinterest 
and there is also a pin on how to easily hang up your frame collage!! 
Frames are the "Virserum" frames from Ikea 
and then we spray painted them to match the glossy white in the room.
www.jarcarfam.blogspot.com - Evan's Baseball / Texas Rangers Nursery Room
In the above picture, Evan's Pawpaw Larry made the home plate with his name, two small bats, and a Nolan Ryan baseball card and ball!! 
His pawpaw also made the bat with the hooks that we really wanted for Evan's room!! I found the idea for the baseball bat with the hooks on Pinterest from this pin.

Pictured below are some details from the room. 
The top left picture is what our friend Justin did at our couples baby shower and then I put the ribbon on it so we could hang it on Evan's room door! 
Top right is just a picture of what is above his door, it's from Hobby Lobby! Another store that is great for decor! 
www.jarcarfam.blogspot.com - Evan's Baseball / Texas Rangers Nursery Room
Pictured above...Bottom left is a vintage 1942 "Pep Young" endorsed Hutch leather glove that Evan's Uncle Sean got for him (Thanks Sean!!). It's perfect for the room and we're going to put Evan's handprint on the ball! Bottom right is the one outlet that wasn't covered so we got a cute plate cover for it from Hobby Lobby and our friend Joey got us the Texas Rangers night light (Thanks Joey!!). :)

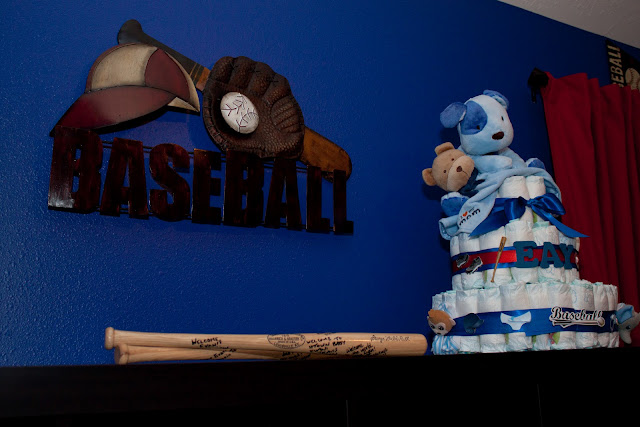
Pictured below is our adorable diaper cake made by our friend Teresa, one of the hostesses of our couples baby shower!! Isn't it adorable!! Thanks Teresa!! 
Also, pictured below is the decorative metal sign we found at Hobby Lobby and the signed bats! I got the idea for the mini bats to be signed at the baby showers from this pin I came across on Pinterest from a wedding.
www.jarcarfam.blogspot.com - Evan's Baseball / Texas Rangers Nursery Room

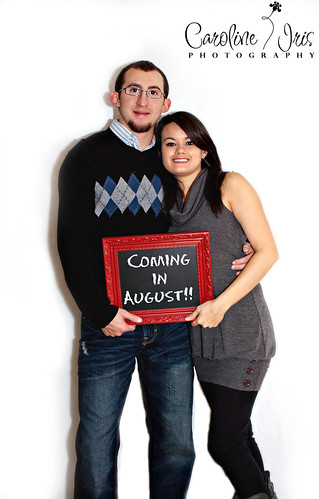
Last but not least, a picture of us in Evan's room from the day of our baseball themed couples shower, of course we were sporting our Texas Rangers gear! :) 
Oh and I am 25 weeks in the picture below! 

www.jarcarfam.blogspot.com - Evan's Baseball / Texas Rangers Nursery Room

We can't wait until our baby Evan is here and we hope he loves his room as much as we do!! :)

Sunday, April 29, 2012

Welcome!!

We have been wanting to start a blog for a long time now.  We plan to use this blog to share the things that are going on in our life, as well as our DIY projects, travels, things we love, and recipes with our friends, family, and whoever.  I hope you'll follow along with us! 

Our family is growing...we are so excited for our little Evan to be born this August! This is our first child!